Sooo... Quite some time since I posted the last time and to be honest not a lot have happened with the car except that it seems to have broken down for real (screeching noise coming from the drivetrain).
I have bought a house with a proper garage though!
As of now I have taken the rear axle out off the car for two reasons: A) I think this is where the noise is coming from and B) I need to change ratio to 3.08 from 4.11 (or 3.89, can't remember right now).
While it's out I'll refurbish it, the springs and the shocks. I'm hoping that this'll be done within the month.
Showing posts with label Buick GS 455 1972. Show all posts
Showing posts with label Buick GS 455 1972. Show all posts
Wednesday, April 7, 2010


Wednesday, May 7, 2008
A quick update
I just realised that I haven't posted in a while and I just wanted you to know that the exhaust is in place, although not 100% perfect but still much better than before.
There's an issue with one of the bolts to the headers not tightening properly but I'll use Loctite or something like that on it and hopefully get it to stay in place.
It seems as if my gearbox is in need of a rebuild though and that seriously sucks. :(
I'll see how things pan out but if this is the case then I don't know what to do - I have no money at all to spend at the moment...
There's an issue with one of the bolts to the headers not tightening properly but I'll use Loctite or something like that on it and hopefully get it to stay in place.
It seems as if my gearbox is in need of a rebuild though and that seriously sucks. :(
I'll see how things pan out but if this is the case then I don't know what to do - I have no money at all to spend at the moment...
Sunday, April 6, 2008
Some progress!
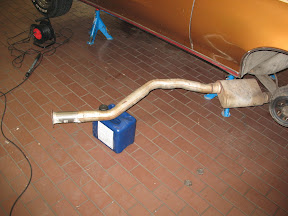 My brother Mattias and I was out at the garage this past week and I was there by myself yesterday as well and we're finally getting somewhere.
 I bought some 3" exhaust pipe that we cut to length. We then cut off the 2.5" adaptor pipes that TA sent me. After we rigged this properly under the car one of my new garage buddies spot welded everything in place.
Yesterday I decided to make sure that the headers was bolted on properly, as well as all the other bolts I've had to take out during the installation. When I loosened the header on the passenger side I thankfully didn't have to remove the starter to fasten the engine bolt which, even though the header was already on tight and snug, saved me quite some time.
There was one bolt missing on the drivers side and the new ones that TA included didn't fit properly. Fortunately the guys at my old garage could hook me up with a bolt.
Of course, when I came back to the new garage there was still one bolt missing but on the other side. I knew I had these bolts when I took the old headers off and after some careful searching I found one wedged in between the tubes coming from the head on the drivers side down to the collector.
Just to make sure that the engine ran as it should I started it up and let me tell you this - I'm glad that I had ear protection. Damn, it makes some serious noise.
This Tuesday a buddy of mine who knows how to weld will help me out with the rest of the exhaust. I don't want to risk anything by doing it on my own.
Wednesday, March 19, 2008
Changing the headers, not as easy as I thought
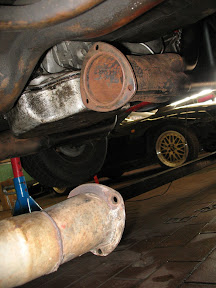 Over the past few days I've been trying to replace my old headers with the brand new from TA Performance. This has proven more work than I cared for.
Getting the old ones out and the new ones in was only time consuming as we needed to lift the engine and the real work started when I was about to reconnect the existing exhaust to the new headers.
First off I noticed that I couldn't get the exhaust out from under the car as it's all welded in one piece.
Then I notice that not only are the bolt holes rotated 180 degrees but the exhaust pipe is about 3.5 cm to short which means that I had to cut off the old adapter and weld the new one in place.
The problem with this is that the new headers points in a slightly different direction compared to the old ones which means that I need to realign the new adapter.
On top of this the new adapter is also too small - 6 cm in diameter compare to the old 7.5 cm - so even if I can fix the alignment it's not going to fit properly. The only option left is to buy a new adapter pipe.
So it won't be done for at least another week due to easter coming right up.
Saturday, March 15, 2008
Changing the headers
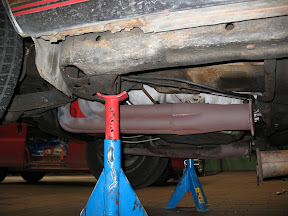 I decided to take a stab at changing the headers while the engine hoist is still in the garage (it's a loaner).
 Over at the V8Buick forums there are some that claim that you can change the headers without lifting the engine out of the car but I must say that with a big-block it's a very tight fit and I'd rather spend an hour lifting the engine.
Today I only managed to get the car up in the air, disconnect the exhaust and disconnect the headers from the engine. The hard part is tomorrow when I'm actually going to raise the engine and put the new headers in there.
Monday, March 10, 2008
Street legal!
Woop!
I just got off the phone with the authorities here in Sweden and it turns out that my car is street legal after all!
I have until May 2009 to fix the mufflers and other assorted issues that might prevent it from passing the DMV inspection, something that should be doable now that I have a proper garage.
I just got off the phone with the authorities here in Sweden and it turns out that my car is street legal after all!
I have until May 2009 to fix the mufflers and other assorted issues that might prevent it from passing the DMV inspection, something that should be doable now that I have a proper garage.
Sunday, March 9, 2008
Adjusting the timing
Yesterday me and my good friend Ulf was out at the garage trying to adjust the timing as the car didn't run properly.
Following this excellent thread on the V8Buick forum we set out to do good. Only to find out that nothing we did seemed to correspond with the information in the thread.
The idle timing seemed way off and the 30 degree mark climbed way past the timing tab as soon as I touched the throttle. Still the car ran decent so we adjusted it as good as we could and took it for a short test spin.
Sure enough, lot's of tire smoke and "oomph" as well as big grins on our faces. Seeing as the weather was great we decided to take the car for a longer drive and during this we felt that there was something lacking still.
We started adjusting the distributor cap in small increments and finally dialed in what seems to be the perfect setting. The car really flies and has a lot of torque. The only problem is that the timing still seems to be off.
I'll try and double check this later today but I need to wait for a buddy or brother to assist me.
Update: The timing was only off by 2-3 degrees when we checked so when I get the time I will adjust it to the proper setting.
Following this excellent thread on the V8Buick forum we set out to do good. Only to find out that nothing we did seemed to correspond with the information in the thread.
The idle timing seemed way off and the 30 degree mark climbed way past the timing tab as soon as I touched the throttle. Still the car ran decent so we adjusted it as good as we could and took it for a short test spin.
Sure enough, lot's of tire smoke and "oomph" as well as big grins on our faces. Seeing as the weather was great we decided to take the car for a longer drive and during this we felt that there was something lacking still.
We started adjusting the distributor cap in small increments and finally dialed in what seems to be the perfect setting. The car really flies and has a lot of torque. The only problem is that the timing still seems to be off.
I'll try and double check this later today but I need to wait for a buddy or brother to assist me.
Update: The timing was only off by 2-3 degrees when we checked so when I get the time I will adjust it to the proper setting.
Monday, March 3, 2008
A new garage - a new start
 So, I finally moved to a new garage and let me tell you, it feels great to be able to start working on my car again.
There's a couple of things I need to get done though, setting up a work bench and stuff like that, but I can more or less get cracking on all the things I have been postponing for several months.
Unfortunately the engine still runs a bit crap so I need to take another stab at the valves and the ignition before I begin with the interior (no need for a fancy looking car that won't go anywhere).
I also discovered a lot more surface rust than when I parked the car last autumn so I need to get cracking on that before it eats through the metal.
For a couple of pictures of the old garage and the new one, start here.
Saturday, February 16, 2008
Kind of back in the swing
I was up at the garage earlier today, trying to do as much as I could with my car seeing that it's crammed into a corner of the garage (we're talking about how to solve this issue but still haven't found a solution).
Before I parked the car last autumn I tried a rather crude method to adjust my valve lifters (as I thought they made the noise I've been hearing from the engine) but it turned out less than stellar; the engine lacked power and "oomph" after the adjustment.
After some searching I decided to try out a method described over at Crane Cams (scroll down to the "Adjusting Hydraulic Lifters for Proper Preload" section) which basically involves adjusting the intake and exhaust valve for one cylinder at a time.
As a relative beginner at engine tuning I decided to use this method as it's quite foolproof, easy to perform and you can stop at pretty much any time in the process and still get back to where you left off.
I got the drivers side done before I had to head back home (some of my garage mates talk for hours) and I plan to do the other side tomorrow. It's a bit of a workout cranking the engine around by hand but the method gives me complete control, which I like.
Before I parked the car last autumn I tried a rather crude method to adjust my valve lifters (as I thought they made the noise I've been hearing from the engine) but it turned out less than stellar; the engine lacked power and "oomph" after the adjustment.
After some searching I decided to try out a method described over at Crane Cams (scroll down to the "Adjusting Hydraulic Lifters for Proper Preload" section) which basically involves adjusting the intake and exhaust valve for one cylinder at a time.
As a relative beginner at engine tuning I decided to use this method as it's quite foolproof, easy to perform and you can stop at pretty much any time in the process and still get back to where you left off.
I got the drivers side done before I had to head back home (some of my garage mates talk for hours) and I plan to do the other side tomorrow. It's a bit of a workout cranking the engine around by hand but the method gives me complete control, which I like.
Saturday, May 5, 2007
Replacing the sheet metal below the battery tray
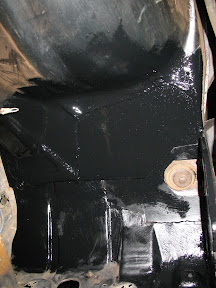 As I've mentioned before the sheet metal beneath the battery tray was in pretty bad condition.
 This section is made up of sheet metal from the inner fender as well as the front assembly, lying on top of eachother which makes it rather cumbersome to repair.
With the time and money constraints I have we therefore went another route and cut out the rotten metal with the fender and the front assembly still in the car.
This meant that we couldn't do a perfect job but for the time being it is quite adequate. My intentions are to replace or repair this properly when I do a frame-off restoration of the car in 5-7 years time.
Engine assembly
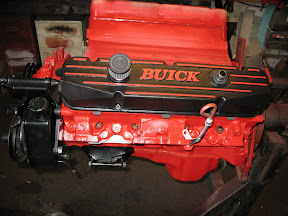 The assembly of the engine is coming along nicely. I got one of the valve covers painted and although I wasn't sure about it at first, I like it more and more now.
There's also been a lot of stuff painted and "chromed" the past days (just click on through the images from the one I linked).
I will still need to touch up some of the paintwork as it got scratched during re-assembly, no matter how careful I (thought) I was.
Monday, April 30, 2007
The rest
Just a small "misc" post to inform you about all the little things that I did the past weekend.
I bent some new trans cooler lines. I also had to bend a new brake line as the one I bought was too short.
I didn't get a chance to replace the rotten sheet metal as Reijo was out of town (I'm not a good welder and he's a great welder so better wait for him ;).
Hopefully I'll be able to swing by the garage later today (despite my cold) and tomorrow (holiday here in Sweden).
I bent some new trans cooler lines. I also had to bend a new brake line as the one I bought was too short.
I didn't get a chance to replace the rotten sheet metal as Reijo was out of town (I'm not a good welder and he's a great welder so better wait for him ;).
Hopefully I'll be able to swing by the garage later today (despite my cold) and tomorrow (holiday here in Sweden).
Even more painted
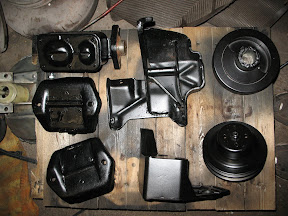 These posts all start to look alike but that's because there's a lot to be painted right now. Despite it taking time it's still fun to see everything coming together.
Friday, April 27, 2007
The latest stuff
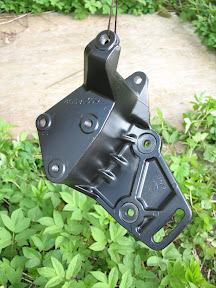 Not a lot done done since the last post but that's mostly because cleaning and painting the engine parts takes time. Not to mention that removing the old lines took for ever.
I did get quite a few engine parts painted. I also got new brake lines to replace my old ones.
I'm hoping to replace all the sheet metal for the battery tray by tomorrow as well as shape and install the new brake lines.
A deadline!
One of my garage buddies got me a time at the DMV the 22'd of May so now I have to get busy. :)
This is good because I have an actual date that I have to have the car done. It's bad because now I have to work on the car even if/when I don't feel like it which might affect the quality of the work done.
Still, no turning back now. :)
This is good because I have an actual date that I have to have the car done. It's bad because now I have to work on the car even if/when I don't feel like it which might affect the quality of the work done.
Still, no turning back now. :)
Sunday, April 22, 2007
Replacing the battery tray
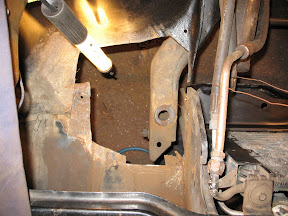 The battery tray and surrounding sheet metal was long gone on this car so Reijo helped me cut out the rotten metal.
The inner fender connects to the frame via a plate that in turn is connected to the frame via a rubber bushing. This plate was in pretty bad shape as well.
We decided to keep it though and after some intense wire brushing it looked almost decent. Since it's been eaten by rust we'll reinforce it with some new metal.
After this has been done we'll fabricate new sheet metal and start repairing the fenders. Then it's just a couple of coats of paint and installing the battery tray. :)
Painting the engine
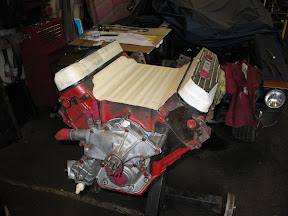 Long time since the last post - I've been busy though. :)
I've gotten most of the engine painted, although it needs another couple of coats to look the way I want it. I've run out of paint though so I'm waiting for that at the moment.
The hardest part when painting the engine has - of course - been getting it clean enough to paint. There are a lot of nooks and crannies in an engine and it's surrounding parts.
With the use of power tool wire brushes and generous use of brake cleaning fluid (as suggested by a member of the V8Buick.com forum) I got most of the parts clean enough to paint though.
The second hardest part of this is getting paint in all of these nooks and crannies, without getting too much paint on all the other parts of the engine. I still have a couple of places where I'll need to touch up with some more paint.
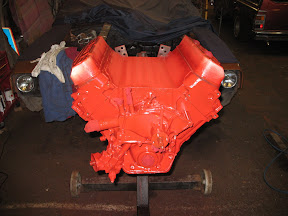 I had initially planned on painting all of the bolts for the engine in black but that proved to be too time consuming (putting the engine together, paint it, taking it apart, paint the bolts, put it back together once more) so I just painted the bolts for the intake as for now.
I might paint other bolts - for accessories and such - in red (as these parts are in black), all depending on how much time I have.
The single biggest problem I encountered was when the gasket for the oil pan crept out as I put on the oil pan. I didn't notice either so it sat like this for a day or two. I managed to reseat it pretty good though so it should stay tight.
Sunday, April 8, 2007
Painting the firewall and cutting out rust
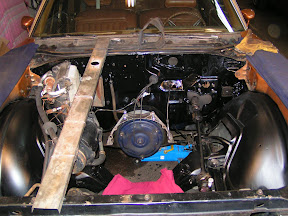 Yesterday I painted the firewall. There are some areas that are harder to reach than others but I think it'll be quite good when I'm done.
I also started cutting out rusted sheet metal from under the battery tray. I'm guessing it'll be a bit tricky to repair as the inner and outer fender overlap but I'll cut out the bad and keep as much good as possible and go from there.
Saturday, April 7, 2007
More paint!
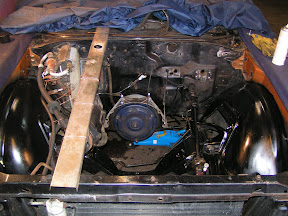 Well, not a lot to add besides the fact that I painted even more of the engine room as well as my old headers and a couple of engine accessories.
I'll try and get the firewall done today.
Friday, April 6, 2007
Time for paint
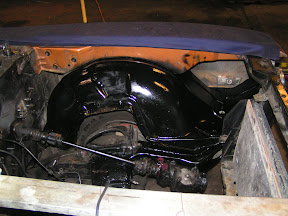 I finally got the engine room as clean as I can, given the time and money I have available, and started painting it yesterday.
I'm using a matte enamel acrylic paint that others in my garage has used with great success. You might wonder why I went with matte and not semi-gloss or even gloss and the sole reason is that there was no semi-gloss and I think that gloss is too shiny.
My reasoning is that with a matte engine room the engine will stand out even more (which, by the way, will be painted in proper Buick red and have semi-gloss black accessories). This might prove to be completely wrong but then I have a reason to do it again. :)
Unfortunately the paint for my engine didn't arrive yesterday and since it's Easter it won't arrive until next Tuesday at the earliest. I still have a couple of things to paint over at my brothers place (where they can dry in peace) and the engine room isn't finished either so it's not like I don't have anything to do.
Still, it'd be nice to get the engine back together. I have a pretty ambitious idea for how to paint the engine, we'll see how far I get when it comes to implementing it. ;)
Subscribe to:
Posts (Atom)

