Showing posts with label Electronics. Show all posts

Wednesday, March 28, 2007

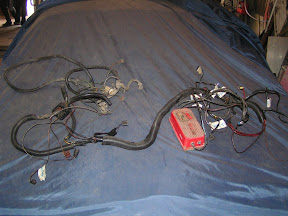
A new wiring harness - nothing but a dream?

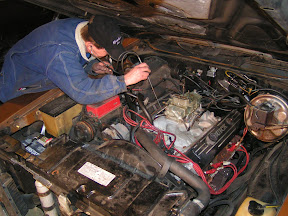
As my old wiring harness looks like crap I decided to buy a new one.

The only problem is that the guys I'm buying it from don't have any in stock, the earliest they can have one done is in 4-5 weeks.

On top of that they might not even ship to Sweden and if they do it's via UPS or FedEx which will cost me roughly a ton of money.

Time to hit the forums and ask for advice yet again. :)

Update: I spoke to American Autowire instead and they only needed one week to build it and then another week to ship it. The best part of all is that they ship with the US Postal Services which means that shipping and insurance only added up to about $30!

So - a new engine harness within 2 weeks for around $180 (1280 Kr). Better than expected. :)

Tuesday, March 13, 2007

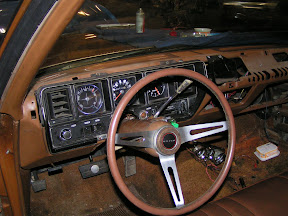
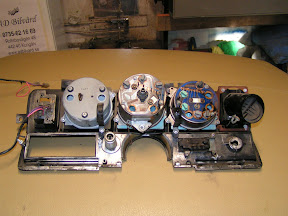
Putting the dash back together

This Saturday I had planned to prepare for the engine removal but I realised that it would be better to get the dash back together first. Unfortunately working on the car felt like a chore the entire day.

I guess part of the reason for that feeling was that I still had some of my cold still in me. The fact that I was overconfident when I took the dash apart and had a really hard time recollecting where all the parts would go didn't make things better either.

I got the instrument cluster together except for some of the light bulbs in the instruments. The previous owners probably didn't care too much about them as I know I haven't misplaced any of them.

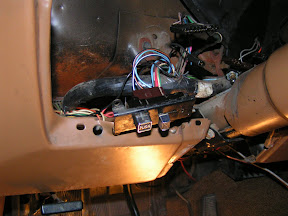
Another thing I couldn't reconnect due to my lackluster marking of wires is the switch to the rear window defroster. The helpful members on the V8Buick.com forum gave me some pointers that I'll try out this coming weekend.

At the end of the day I barely got the instrument cluster back in but decided to leave it at that as I needed to get working on the engine - I can work on the dash while waiting for the engine/engine room paint to dry.

The biggest headache after getting it back in was the fact that the generator light wouldn't go out even after I started the engine which means that either the generator is busted (and it worked before I stopped driving last year) or that the instrument cluster is borked.

I'll post that question to the board as well.

Sunday, February 18, 2007

Almost all the dash electronics done

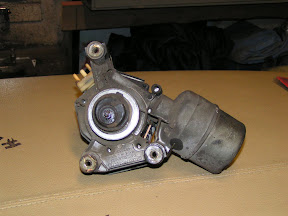
The parts I ordered for my car came in this week; a new wiper/washer motor/pump (I was told it'd be new but it was in fact remanufactured), a relay for the fan motor and light bulbs for the dash lights.

First up was the fan relay as this was the easiest one. It's not ideally located but I've got long arms so I got it back in there. Only problem was that when I went to test it all out the fan only worked at the Low setting. Sigh.

I took out the voltmeter and checked all the connections and they all had proper voltage. I followed the wiring, testing bit by bit, until I got to the fan resistor. After jostling that about the fan worked as it should so I'll take a closer look at it later on.

Next up was the wiper motor. As I mentioned above I was expecting a new unit but got a remanufactured one. There's still warranty on it and it's not extremely difficult to replace but it'd be nice to have a new one in there.

The mechanical installation wasn't all too difficult. I had to widen the gap in the plate that connects directly to the motor shaft as it was 0.1 mm to narrow. The real worries began when I hooked up the electronics.

At first it all seemed fine; the wipers and the washer pump all operated as they should but when I tried to turn the wipers off - they just kept going up and down in very small movements just at the lower turning point.

I was stumped and had no idea what it could be. I started measuring voltages just about everywhere but it all looked just fine. I finally realised that I should probably check the Fisher Body manual and after about 10 minutes of reading I located this exact problem and how to troubleshoot it.

It turned out to be the ground to the dash controls for the wiper/washer. When testing I just hooked the control switch on to the connector so there was no ground what so ever. After temporarily screwing it to the dash sheet metal the wipers worked as they should.

Rejoice!

Reijo was going to help me listen for unwanted engine sounds but he was away on an errand so I started removing old tape residue from the vinyl roof while I waited for him. As to why there's tape residue to begin with I have only myself to blame.

When the car started to take in water during the autumn rains that plagued Sweden for the better part of three months I taped over every trimming on the roof, hoping that It'd keep tight(er). It didn't help at all.

All that it did was cling to the chrome and vinyl making it almost impossible to remove. First I tried with paint thinner but it seemed a bit too aggressive against the vinyl so I bought another solvent, designed to remove old glue. I got most of it off but I'll need to go over it again later on.

After Reijo got back he brought out the stethoscope and listened to the engine for 5-10 minutes while I took it from idle to about 1500 RPMs. The good news is that he couldn't hear any actual noise coming from within the engine besides some very minor rattling from the valves but not enough to worry about.

There still was a sharp, clonking noise coming in relatively regular intervals. I've always attributed that to a header hitting the frame as it goes away as soon as you rev the engine past idle but Reijo wanted to listen to the oil pan with the stethoscope as well before dismissing internal problems. To do that we need to lift the car off the ground which we didn't have time for yesterday.

Still, here's hoping that all I have to do is upgrade the oil system and not replace the main and rod bearings.

Tuesday, February 6, 2007

Vacuum, interior and clock/tachometer swap

Unfortunately I didn't bring the camera with me this past Saturday as my brother needed it. Unfortunately because I actually made some progress as far as getting things back together in working condition instead of just taking things apart.

The first thing I got up and running was the vacuum for the heater system. I didn't test all vacuum diaphragms but those I did test worked so I'm cautiously optimistic as for the state of the others.

I also got the clock out of it's housing although I had to resort to violence as one pin broke loose, preventing me from removing the nut from it. I've been told that there's plenty of clocks to go around though so it wasn't too bothersome putting the hacksaw to it.

The next thing was to take apart my external Autometer tachometer which didn't prove to be all that taxing. After disassembling it I did a quick test fit in the old clock housing and I'll need to do quite a bit of fabrication in order to marry the two but it should be quite doable.

That's how far I got with the clock/tachometer project as I also started to straighten out and re-fasten a trimming that has come off from the roof on the drivers side (this is the best "before" picture I have of it).

This proved to be harder than I thought as I'm most likely missing some sort of clips or similar to fasten it with as no matter how I re-shaped it, it wouldn't stick to the ceiling properly.

I got a proper price estimate for a couple of parts ($50 for the wiper motor was some sort of delirious dream); the wiper motor is $165 and the high-speed fan motor relay is $19. Considering that I'd need to pay VAT, shipping and customs on these parts if I brought them in on my own from the states it's a very decent price.

Next up is to ask for a price quote on a couple of oil system mods from TA Performance that might be what I need (I had some concerns about the oil pressure of the engine when I got the car).

Oh, and I need to talk to the bank about a loan as well.

Tuesday, January 30, 2007

Vacuum, fan blower motor, wiper motor and surprises

This past weekend I got quite a bit done so let me break it down a bit.

The vacuum

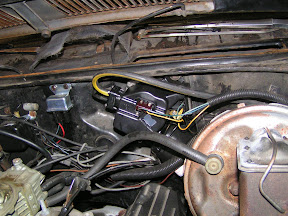
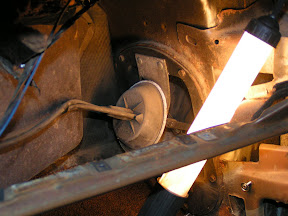
I decided to take a look at the lack of vacuum from point a to b and started in the engine bay. I quickly located the vacuum tank and in the process the reason for the absent vacuum; there's no hose connected from the engine to the vacuum tank.

Unfortunately I have no hose available but I'll buy me some at the local parts dealer and test this out this next Saturday. I'm not quite sure why the vacuum was disconnected but I'm hoping that it's not because it's busted.

I was told that the nipple in this picture is the place to get the vacuum from. The nipple seems a bit bigger than the connection at the vacuum tank but I should be able to work that out.

The fan motor

I've been working on the car with the battery disconnected for various reasons and after figuring out how to troubleshoot the electric part of the heater control I hooked the battery back up. Imagine my suprise and joy when the fan control worked!

My only explanation is that there must have been a lot of corrosion on the connectors of the control and that me taking things apart removed the corrosion. The fan won't operate at the max speed but I was told that this is due to a faulty high speed relay. These can still be bought as a new spare which is what I'll do.

The wiper motor

I decided to take the wiper motor out as well while I was at it. This is most likely the cause for the non-operational washers as there's voltage all the way to the connectors at the motor.

These' aren't immensly expensive - around $50 if I recall correctly (I can't find the source right now though) so I'll buy one of these as well.

The bearings

I got hold of a company that can help me grind down the cam axle to correct tolerances and asked for a rough price estimate. The guy I talked to said that it could cost anything between $300 - $600 depending on the amount of work needed. Well, it's better than nothing and not too far from what I expected.

The surprises

While mucking about at the carburator in order to locate a good place to get the vacuum from I noticed something odd. The previous owner has jammed the choke valve wide open for some reason.

I've always felt like the car didn't perform as it should and used up a lot of gas - this might be why. I got a cable for this from Reijo though and after the engine is back in I'll try and fab a plate for hooking the knob up to the dash.

Rummagin about in the engine bay I also noticed that the generator and the AC compressor are misaligned. Talking to the guys over at V8Buick I learned that my generator is missing a bracket which might be the cause of the misalignment.

On top of this I discovered rust where I do not want it; right below the front windshield.

The fun never ends.

Sunday, January 21, 2007

The vacuum/heater control system

I've been going through the Buick factory manual I ordered from Detroit Iron Information Systems, reading up on the controls for the heater and A/C unit. Slowly I begin to understand just how the entire thing works (or should work at least).

Now, I won't be giving away the entire manual here, just a page or two in order to illustrate how it all works. If you need the manual - buy it. It really is worth the money, even though it can seem expensive.

The controls in the dash control both vacuum as well as electronics; the vacuum controls all the various doors in the system (there are 5 doors all in all; the defroster door, the mode door, the deflector door, the temperature door and the outside-recirculated air door).

The Fan switch controls the speed of the fan motor electronically as well as being the master vacuum switch. When you move the Fan switch to any position besides the "Off" position the outside-recirculated door is partially opened via a vacuum diaphragm.

The Temperature lever controls vacuum flow to the water valve; at the leftmost position no water from the radiator flows to the heater core and at the rightmost position the valve is fully opened.

Finally, the Selector switch controls the following doors via vacuum; the defroster door, the heater-air conditioner mode door and the outside-recirculated door. It is also mechanically linked to the A/C compressor clutch switch.

Vacuum is provided from a vacuum in the engine and goes through a vacuum tank to the master vacuum switch (the Fan switch, remember). The Temperature lever also receives vacuum directly from the tank so that the temperature of the air can be controlled without running the fan.

This means that if the master switch doesn't work, there'll be no vacuum to the Selector switch. It also means that you should be able to get warm air to flow through the system if you move the Temperature lever all the way to the right as this works without the master switch.

My guess is that if you don't get warm air through the system when driving your car with the Temperature lever all the way to the right with the Fan switch in the "Off" position you might have a vacuum problem. I can't say for sure though as I haven't checked on my own car yet.

You should also be able to measure voltage at the Fan switch in order to see if you have 12 volts at the 'F' pin (Brown wire). Following the wire diagram you should have 12 V out on all the other pins as well depending on what position the switch is in. These lead to various points in the fan blower resistor and from there on to the actual motor.

As for testing the vacuum, the easiest thing would probably be to run the engine on idle and then disconnecting the hose going to the vacuum tank in the engine bay (the 'in' connection on the tank) and feel if you have a vacuum there. If not, I'd guess your vacuum pump is busted.

If you do have vacuum you just connect the hose again and keep disconnecting hoses further down the chain until you find the leak. If there's vacuum all the way to a door diaphragm and the door still isn't moving then there's not much else to do than replace the diaphragm if you ask me.

As for the fan blower motor you should try and measure the resistor before you take apart half the car in order to get to the motor (it sits below the outer fender on the passenger side). There should be a wire running from the A/C box in under the fender from the engine bay. I can't tell you more as I have yet to do this but this is one advice I've been given.

There's a lot more to write on this subject but since I'm very much a beginner when it comes to troubleshooting this and keep guessing for most of the time I'll leave it be for the moment. Hopefully someone is helped by this information.

Feel free to post corrections, suggestions and ideas in the comments.
Sunday, January 14, 2007

Getting the cluster out

Yesterday I finally got my instrument cluster out of the car, unfortunately it didn't do me a lot of good as far as the ventilation goes.

The climate control... eh, controls uses a combination of vacuum and electrics in order to control where and how the air goes. The switches that are up at the dashboard connects via vacuum lines to various vacuum controlled gates that in turn let hot or cold air into the system.

Vacuum lines are also used to control the speed of the fan. How this works I can't tell you because I don't know. And I don't know why this design was even used to begin with where electric switches and wires should be enough.

Anyhow, I can't just measure voltage at the switches because there are none to be measured as far as I can tell. The problem could be with the actual fan motor but as I have to remove the front passenger fender (and in the process the front bumper) in order to get to it (no kidding) I won't go there unless I really have to. Thus I've, once again, turned to the V8 Buick forum for advice.

Now that I have the cluster out I'm going to do two things; adjust the fuel meter as it shows 1/3 empty when the tank actually is empty and replace the clock with a tachometer. I have the one lying around that came with the car, bolted to the dash (looked ugly like hell). With a bit of luck I can fit it in the old clock housing.

Not a lot of work done but I kind of ran into a wall with all the disassembly overhead needed to get to the fan motor.

Saturday, January 6, 2007

Tackling the dashboard electronics

Today was the first day of real work on the car after I put it in a garage. I couldn't do very much as it's still sandwiched between Anders' and Reijo's cars so I decided to go ahead with the dashboard electronics.

I've tried to take the dash apart before with no luck but this time I had repair manual printouts by my side, something that improved the odds a lot. I still took my time doing things though, this being the first time I disassemble a 35 year old car.

Doing it "by the book" it took me about 3 hours getting the dash and the instrument cluster loose. I ran into problems getting the instrument cluster all the way out though - I'm guessing I need to unhook some tubes that the manual doesn't mention. I'll check with the V8 Buick forum.

Soon after posting this I realised I've read somewhere on the Internet about how to remove the instrument cluster. After a minute's worth of brainstorming I recalled George Nenadovich most excellent instructions on how to do this. George's site is a great resource for Buick newbies like me - he has tons of great info.

Another thing I decided to take care of was the head light switch. The "bolt" that held it to the dash was broken off when I got the car. A member of the V8 Buick forum hooked me up with one free of charge (Hi Steve!) but I haven't had a chance to replace it yet.

Looking at the switch you could tell that it had taken damage from the water that has gotten into the car the past months. So I took it apart and cleaned it up. It turns out that it's a lot easier to keep the switch out of the cluster in order to get the cluster back into the dash so I never did mount it. It should work better now though.

I also took a quick look at the front windshield. Reijo knows a guy who can replace it for me for about $115 (800 Skr) so that's what I'll do - it's a lot better option than having me replacing it, probably making it worse in the process.