Showing posts with label Interior. Show all posts

Sunday, February 11, 2007

The clock to tachometer conversion

Yesterday I was determined to get the clock to tachometer conversion done. I had planned it all out in my head and knew exactly how I wanted to do it.

I had bought a clear plastic sheet about 2 millimeters (mm) thick as well as some black, semi-gloss paint, the rest of the tools needed for the fabrication should be available in the garage.

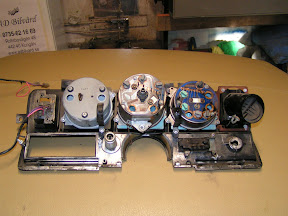
I had already disassembled the clock and tach a week ago so I started out by measuring where the new holes was going to end up. After I created a template it was quite easy to mark and drill the holes.

Now I needed to figure out how much the old spacers in the tach had to be cut down in order to fit behind the plastic cover. 10 mm had to come off but it turns out that the inner threads for the fastening screw didn't run all the way down so I had to find a new solution.

Reijo suggested using old fuel line copper tube cut down to 8 mm (the original rise of the existing spacers were 18 mm). This worked out great and after clamping the copper tube to the screws the spacers even stayed put when installing the unit into the old housing.
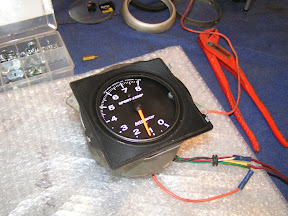
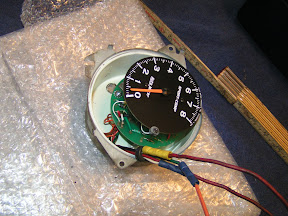
Next up was to fabricate a new black cover since the tach was smaller than the clock. Again Reijo chimed in and came up with the idea to reuse the cover ring from the Autometer housing in order to create a very nice looking cover.

The only complication with this idea was that the rev limiter lamp sticks out a bit which meant that I had to mount the inner cover ring "inside out". Not a big deal, it's just a less snug fit against the face of the meter. After a couple of quick layers of paint I then secured the ring to the outer cover with some glue.

Here's the unit without the plastic cover. Speaking of which, the plastic cover was the next thing on the list.
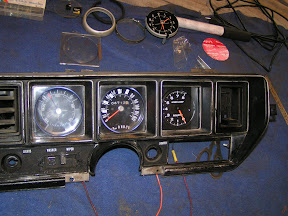
I traced the outline from the old cover (which I couldn't use for two reasons; it was concave, touching the needle, and it had a hole for the clock setting knob). It turned out that the plastic I had bought cracked far too easy and I had to scrap my first attempt.

Despite doing my best not to scratch or crack the second cover it still cracked almost everywhere. At least I avoided the scratches and it turns out that when the unit is mounted in the instrument cluster the cracks aren't visible. If I had more time I'd redo it until it's perfect but I have to settle with this as I do not have more time.

Still, not to bad for a days work if you ask me.

Tuesday, February 6, 2007

Vacuum, interior and clock/tachometer swap

Unfortunately I didn't bring the camera with me this past Saturday as my brother needed it. Unfortunately because I actually made some progress as far as getting things back together in working condition instead of just taking things apart.

The first thing I got up and running was the vacuum for the heater system. I didn't test all vacuum diaphragms but those I did test worked so I'm cautiously optimistic as for the state of the others.

I also got the clock out of it's housing although I had to resort to violence as one pin broke loose, preventing me from removing the nut from it. I've been told that there's plenty of clocks to go around though so it wasn't too bothersome putting the hacksaw to it.

The next thing was to take apart my external Autometer tachometer which didn't prove to be all that taxing. After disassembling it I did a quick test fit in the old clock housing and I'll need to do quite a bit of fabrication in order to marry the two but it should be quite doable.

That's how far I got with the clock/tachometer project as I also started to straighten out and re-fasten a trimming that has come off from the roof on the drivers side (this is the best "before" picture I have of it).

This proved to be harder than I thought as I'm most likely missing some sort of clips or similar to fasten it with as no matter how I re-shaped it, it wouldn't stick to the ceiling properly.

I got a proper price estimate for a couple of parts ($50 for the wiper motor was some sort of delirious dream); the wiper motor is $165 and the high-speed fan motor relay is $19. Considering that I'd need to pay VAT, shipping and customs on these parts if I brought them in on my own from the states it's a very decent price.

Next up is to ask for a price quote on a couple of oil system mods from TA Performance that might be what I need (I had some concerns about the oil pressure of the engine when I got the car).

Oh, and I need to talk to the bank about a loan as well.

Sunday, January 14, 2007

Getting the cluster out

Yesterday I finally got my instrument cluster out of the car, unfortunately it didn't do me a lot of good as far as the ventilation goes.

The climate control... eh, controls uses a combination of vacuum and electrics in order to control where and how the air goes. The switches that are up at the dashboard connects via vacuum lines to various vacuum controlled gates that in turn let hot or cold air into the system.

Vacuum lines are also used to control the speed of the fan. How this works I can't tell you because I don't know. And I don't know why this design was even used to begin with where electric switches and wires should be enough.

Anyhow, I can't just measure voltage at the switches because there are none to be measured as far as I can tell. The problem could be with the actual fan motor but as I have to remove the front passenger fender (and in the process the front bumper) in order to get to it (no kidding) I won't go there unless I really have to. Thus I've, once again, turned to the V8 Buick forum for advice.

Now that I have the cluster out I'm going to do two things; adjust the fuel meter as it shows 1/3 empty when the tank actually is empty and replace the clock with a tachometer. I have the one lying around that came with the car, bolted to the dash (looked ugly like hell). With a bit of luck I can fit it in the old clock housing.

Not a lot of work done but I kind of ran into a wall with all the disassembly overhead needed to get to the fan motor.

Saturday, January 6, 2007

Tackling the dashboard electronics

Today was the first day of real work on the car after I put it in a garage. I couldn't do very much as it's still sandwiched between Anders' and Reijo's cars so I decided to go ahead with the dashboard electronics.

I've tried to take the dash apart before with no luck but this time I had repair manual printouts by my side, something that improved the odds a lot. I still took my time doing things though, this being the first time I disassemble a 35 year old car.

Doing it "by the book" it took me about 3 hours getting the dash and the instrument cluster loose. I ran into problems getting the instrument cluster all the way out though - I'm guessing I need to unhook some tubes that the manual doesn't mention. I'll check with the V8 Buick forum.

Soon after posting this I realised I've read somewhere on the Internet about how to remove the instrument cluster. After a minute's worth of brainstorming I recalled George Nenadovich most excellent instructions on how to do this. George's site is a great resource for Buick newbies like me - he has tons of great info.

Another thing I decided to take care of was the head light switch. The "bolt" that held it to the dash was broken off when I got the car. A member of the V8 Buick forum hooked me up with one free of charge (Hi Steve!) but I haven't had a chance to replace it yet.

Looking at the switch you could tell that it had taken damage from the water that has gotten into the car the past months. So I took it apart and cleaned it up. It turns out that it's a lot easier to keep the switch out of the cluster in order to get the cluster back into the dash so I never did mount it. It should work better now though.

I also took a quick look at the front windshield. Reijo knows a guy who can replace it for me for about $115 (800 Skr) so that's what I'll do - it's a lot better option than having me replacing it, probably making it worse in the process.